Monday, July 30, 2012

My best friend is engaged!!

My best friend is engaged!! I'm a few weeks late blogging about my excitement.. but let's face it, I'm still just as excited as I was the day before she actually got engaged (Yep, sorry Ry, we knew it was coming).. :)

I sat on PINS AND NEEDLES all day Monday, July 9th waiting for THE phone call. I heard my phone ring around 8PM that night and literally sprinted to answer. Two of the most excited, emotional people were on the other end of the phone, 1,200 miles away from me, celebrating the happiest day of their lives. It was seriously magical. I couldn't understand a darn thing Amanda was saying but it didn't even matter. I could just FEEL the happiness, and I jumped around the house/cried for most of the rest of the evening. I bounced up and down screaming "WE'RE GETTING MARRIED!!" and Rob had to remind me that hey, he and I are ALREADY married.

Yeah, but MY BEST FRIEND IS ENGAGED!

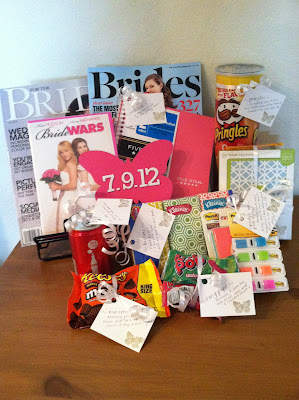
To celebrate this momentous event I put together a little engagement gift for her. If I was closer to home I would have hand delivered it, but instead I enlisted the help of UPS two-day delivery.

I embossed each gift tag with a little butterfly (my signature!) and wrote a note on each as well. Everything included has a special meaning to us (Pringles and all) and I hoped it would make her feel like I was home helping her celebrate this big news. Plus, is there ANYTHING better than receiving mail?? Everyone loves getting mail, and I know my twin is no exception ;)


Amanda, 
I'll be beside you every step of the way... even if I AM 1,200 miles away.I love you so much and I cannot WAIT to stand next to you on your big day. XO

Monday, July 9, 2012

DIY Coffee Bar!

If you know me or my husband personally you know that coffee is a big, HUGE part of our lives. It's actually a little ridiculous when I think about it, but we have definitely evolved into coffee snobs. We grind our own coffee every morning, have perfected the BEST homemade iced coffee and we've even been known to cold-brew in order to get the perfect flavor. We judge a city by it's coffee and if we end up stationed in Pearl Harbor you can bet your britches (yes, I just said that) that we'll be BATHING in Kona. Ok, not really, but you get the picture.

Since coffee is such a big part of our day we've developed quite a little collection of coffee accessories. Our tiny apartment here in Charleston came equipped with a tiny kitchen counter and our coffee essentials have consumed most of the space. I've been dying to set up some sort of coffee-bar in our kitchen for the last year and I have been hunting for a very specific shelf I saw online a million years ago because I knew it would be the perfect addition to my coffee haven.

WELL, the stars aligned and my coffee bar finally came together!It turns out that my friend Jackie knew were to get the shelf I've been hunting for and she has one of her own in her kitchen! GAH! I ordered that puppy as soon as I could get to my computer and I even found a 40% off coupon for it. Ohhhh how I love a sweet deal.

Rob and I hunted around at furniture consignment shops around Charleston the day after I ordered the shelf and after a looking at few different stores we found the perfect little buffet to use for the bar. It's antique and made of light wood. We scored it for an amazing deal and then sweat our butts off as we tried to cram in in the back seat of our teeny-tiny car in the 100 degree heat. We sanded, primed and then painted it a gorgeous color --Behr Ucalyptus Leaf blue. I used my coffee bar project as an excuse to do some damage at target where I got some coordinating linens, a yellow bowl and fun platter to keep my creamer & sugar on. Pictures below!


Buffet found at a furniture consignment shop, Charleston SC
Sanded
Primed
Behr Eucalyptus Leaf - Blue
New Hardware
COMPLETE!


Before
After

The coffee bar now sits pretty in a perfect spot right behind our kitchen table. It's everything I wanted and I'm so excited to share it with you!

Friday, June 29, 2012

Missing in action

Call off the search dogs everyone, I'm back in the blogworld safe and sound after a 2 month hiatus. I know, I know, I'm the WORST. Sorry. Please accept my apology and allow me to explain.

My husband has been away at SOBC (Submarine Officer Basic Course) for the last 10 weeks and I haven't been blogging. This is for a few reasons, actually.

Reason #1: While this blog is meant to chronicle my adjustment to Navy life & my experience finding my "sea legs", I felt pretty uncomfortable letting the world know that I was home alone. Isn't that how every Law&Order SVU or 48hrs Mystery episode starts? -- "Navy wife kidnapped after blog-stalker reads that her husband is away". I DO think I'll detail the ups and downs of deployment here, but only if I find a way to really secure this blog & protect my identity. You can never be too careful, right? Anyway, I just felt weird about it so I decided to take a break.

Reason #2: I had nothing to blog about and to be honest, for the first 4 weeks of our separation I just cried, and cried and cried. 

A recap of the last 10 weeks: 

April 18: Rob loaded up his tiny car and started the trip to Groton, CT for SOBC. SOBC is typically the last phase of training in the Submarine Officer pipeline (Nuclear Power School, Prototype, SOBC), but due to back-ups and maintenance on two of the Prototype boats, Rob's class was sent to SOBC before Prototype. 

April 18-May 16: I cried and tried desperately to feel normal while my husband was away. I slept with the light on in the living room and talked to my dog all.the.time. I worked like a madwoman (WAY more than 40 hours a week) and pretended to be OK when Rob called. I'm pretty sure he saw right through my fake phone-smile.

May 16-May 26: I put my big girl pants on and stopped crying. I started to get into a routine and felt semi-normal. I went out with girlfriends, and continued to talk to my dog. 

May 27-June 3: I visited Rob in CT & our family in Plymouth & Boston!! I also had the incredible privilege of being in two of my best friends' wedding as they married each other on June 2. It was an incredible trip that I'll detail in a post later on.

June 4: Rob was promoted to Lieutenant JG!! Eeeeeeee!

June 4-June 22: I worked, trained Charlie with the help of a local trainer, worked out, stopped sleeping with the light on, and counted down the days till my man would be on his way home to me!

June 22: Rob graduated 1st IN HIS CLASS at SOBC. His mom went to the graduation to cheer him on and I paced around the house waiting for the "I'm on the road & coming home to you!" phone call.

June 23: I opened the door to find my handsome prince HOME where he belongs! Charlie freaked his freak when he saw his daddy for the first time in 10 weeks and I cried while they loved on each other for 10 minutes. We celebrated his homecoming & bigHUGE achievement at SOBC with a lovely dinner at Blossom that night and I'm fairly certain I walked around with a huge smile on my face for days. Siiiiiiigh.

While wives are technically allowed to follow their husbands to SOBC and live in the Navy Chalet with them, I decided to stay behind in Charleston in order to get a feel of what my life will REALLY be like for the next few years. I figured it would be an easy trial run for future deployments and I really thought I needed these 10 weeks to establish my independence. I was able to talk with Rob every day and I was able to visit when I wanted to. (This will NOT be the case when he's actually depoloyed under the ocean). 

I have never, EVER lived by myself and it was definitely a hard adjustment. It turns out that I am NO good at cooking for one and since I work from home (ie: no coworkers to go to Starbucks with) I found myself getting pretty lonely sometimes. However, I'm really glad I did it. I don't think it will make future deployments easier but at least now I know I CAN do this. I can live by myself and I can survive.

I've decided to give myself 3 weeks of absolute misery for every deployment. 2 weeks in the beginning, one in the middle. It's OK to be sad and to feel weird when these big life changes happen, but at some point I do need to put my big girl pants on. And, you know what? It feels pretty darn good when you realize you can DO it.

I can DO this. I'm finding my sea legs. 


Sunday, April 1, 2012

Guinness Shepherd's Pie

Maybe it’s the lack of Irish in me.. but I’m two weeks late to the St. Patrick’s Day party. Whoops! In all honesty, I had full intentions of cooking a delish Irish meal for some friends on St. Patricks Day.. but I got lazy and plans fell through. We ended up dining at an incredible little place in Downtown Charleston called Cru CafĂ©, so all was not lost.

Yep, you read it correctly. I have red (auburn) hair but I am NOT Irish. NOPE, not even a tiny little bit. In fact, 3 of my 4 grandparents can trace their lineage directly to the Mayflower. I’m 13 generations removed from Bradford, Brewster and Carver. No Irish at all. Not sure where this red (auburn) hair came from.

Can you tell I hate when people tell me I have red hair?

(it’s auburn…). 

Our unobserved Irish holiday (and a few extra cans of Guinness in the fridge) gave me the perfect excuse to experiment with one of my childhood favs, Shepherd’s Pie. Mmmmm I love Shepherd’s Pie. However, when I was growing up my mom’s Shepherd’s Pie was a lot more simple: Ground beef (usually turkey, actually), a layer of corn, and a layer of leftover potatoes. I’d smother it in garlic powder while the rest of the family enjoyed it bland. Guess I’ve always been a spice lover.

This recipe puts my mama’s to shame. (Sorry, Mom).


Guinness Shepherd's Pie
Adapted from beautifullyrooted.com
Serves 6

Mashed potato top:
1 1/2 pounds of russet potatoes, peeled and cut into uniform chunks
1 cup milk
2 tablespoons butter
2 tablespoons sour cream
Salt and pepper

Meat filling:
2 tablespoons olive oil for your pan
6 medium carrots, chopped
1 cup red onion, diced
4 garlic cloves, miced
1 1/2 lbs lean ground beef
3 tablespoons flour
1 tablespoons ketchup
3 teaspoons Worcestershire sauce
1 tablespoon Italian seasoning
1 1/2 cup Guinness beer
1 cup frozen peas
1 cup frozen corn
Salt
Pepper

Cut your potatoes into medium sized, uniform chunks. Place them in a pot and cover them with water. The water should only cover the tops of the potato chunks about a half inch. Boil the potatoes until they are fork tender. Remove, drain, and mash your potatoes. Add the milk, butter, sour cream and some salt & pepper to your mashed potatoes. Continue to mash until smooth. Taste frequently (both for your enjoyment and to check flavor). Set aside.

Saute the carrots, onions, and garlic with a few tablespoons of olive oil on medium heat. Saute for 5-10 minutes until onions are translucent and carrots begin to soften. 

Add the ground beef to the vegetable mixture and cook through. Then, add peas and corn and cook for a minute or so.

Sprinkle the flour over the top of the meat mixture. Stir. Then, add the ketchup, Worcestershire sauce, Italian seasoning, and beer. Add more salt and pepper as needed. Cook for 10-15 minutes until the liquid thickens and resembles a thick gravy.

Put the meat filling in an 11x7 inch Pyrex pan or round baker. Carefully spread the potatoes over the meat filling. Place your pan on a baking sheet (it WILL bubble over and cake to the bottom of your oven if you aren’t careful) and cook at 400 degrees for 25 minutes. Let cool slightly before eating.. unless you've developed a tolerance for eating molten lava. 

Enjoy!!


Lemon Pepper Shrimp

This shrimp recipe is a keeper. It’s light, lemony, and perfect for a quick weeknight meal. 

When you’re tired of the 2 week chicken/red meat rotation, I suggest trying this little baby out. Paired with some fresh veggies or roasted broccoli, it promises to satisfy even the hungriest of husbands (or roommates, or kids, or ..whatever).


Lemon Pepper Shrimp
Adapted from Cooking Light
Serves 4

1 1/2 pounds peeled and deveined uncooked jumbo shrimp
1 cup uncooked orzo
2 tablespoons chopped fresh parsley
1/2 teaspoon salt
2 tablespoons unsalted butter, divided
2 teaspoons minced garlic (approximately 3 cloves)
Juice of one whole lemon
1/4 teaspoon black pepper

Cook orzo according to package directions. Drain and set aside in a bowl. Add a little bit of butter or olive oil to keep the pasta from sticking together. Stir in chopped parsley and 1/4 teaspoon salt. Cover with foil and keep warm.

Melt 1 tablespoon butter in a large nonstick pan over medium-high heat. Sprinkle shrimp with 1/4 teaspoon salt. Add shrimp to pan; sauté 2 minutes or until almost done. You may need to do this in two batches depending on how large your shrimp are and how many shrimp fit in your pan. Remove shrimp from pan and place on a plate.

Melt remaining 1 tablespoon butter in pan. Add garlic to pan and cook for 30 seconds, stirring constantly. Be careful not to burn the garlic. Then, stir in shrimp, lemon juice, and pepper; cook 1 minute or until shrimp are cooked through. Serve over orzo. Enjoy!!


Roasted Broccoli

I love the thrill of a good deal. So, when I found a gigantic (3 lb?) bag of broccoli at COSTCO I just had to have it.

It turns out it’s pretty hard to use 3lbs of broccoli when you’re only feeding two people. I learned my lesson, and we ate so much broccoli that we almost turned green*.

*not really.

I vowed to use every broccoli floret in that bag and I DID. Triumph!

In an attempt to lazily use the last ¼ of the bag I came up with this quick recipe. I roast a lot of vegetables so it wasn’t that much different than anything I’ve done before. Roasted broccoli tastes A LOT different than raw or steamed broccoli. It’s nutty and juicy… And well, just plain delicious.

Rob loved it. I loved it. We ate the whole darn pan of it in one sitting.


Roasted Broccoli
Serves 4, (or two Block family members)

3/4lb broccoli florets & stems (cut the stems small if you’re using them)
3 cloves garlic, minced
2 tablespoons olive oil
Salt
Pepper

**other additions you might like: red pepper flakes, parmesan cheese, lemon juice

Preheat your oven to 450°.

Combine broccoli, olive oil, garlic, salt and pepper in an oven-safe baking dish.

Roast broccoli about 20 minutes, or until you can pierce stems with a fork. Your broccoli will be very slightly browned and wilted. Enjoy!!


Friday, March 23, 2012

Pulled Pork Sandwiches

If you don’t have a crock pot, we can’t be friends. Actually, we can still be friends but let me know if you don’t have one so I can buy you one for your birthday. You need one.

Crock-potting has changed my life. Working from home is great, but believe it or not I STILL don’t have time to prepare a fabulous meal every night. I love my crock pot and use it for literally anything possible. One step cooking and one step cleaning! Could it be any better?

I’m typically not very adventurous when it comes to pulled pork. I buy a pork butt, I put it in the crock pot with some water and a few spices, and when it’s done I shred it and smother it in Sweet Baby Rays BBQ sauce. My husband likes it, and I tolerate it. It’s nothing special but it works.

WELL, last week I got an AWESOME deal on a 4lb pork butt so I decided to play around with my recipe a bit and spice things up (both literally and figuratively). What resulted was the most delicious pulled pork I have EVER had. Spicy, vinegary and just divine. You have to try this. Either tonight, or after your birthday when I buy you a crock pot.

**Disclaimer: Only make this recipe if you want a few days of leftovers or if you're feeding a crowd. We ate pulled pork for 8 days...... We had it on salads at lunch, in tacos AND with fried eggs. It was delicious on everything, but figured I'd warn you anyway :)


Pulled Pork Sandwiches
Adapted from Williams & Sonoma PP recipe
Serves Way Too Many

4 lb. boneless pork shoulder (or pork butt), cut into 4 pieces
3/4 cup cider vinegar
3/4 cup tomato ketchup
1/3 cup firmly packed brown sugar
1/4 cup molasses
2 tsp red pepper flakes (only 1 1/2 tsp if you're worried about spice)
1 Tbs. Worcestershire sauce
1/2 tsp dry mustard
1 tsp salt
1 tsp pepper
Soft sandwich rolls for serving

Place all 4 pieces of pork in the bottom of your slow cooker.
Then, make your sauce! Heat vinegar, ketchup, brown sugar, molasses, red pepper flakes, Worcestershire sauce, mustard, salt & pepper in a sauce pan over medium heat. Stir frequently. The mixture will begin to bubble and thicken slightly.

Pour the sauce over the pork. Cover and cook your pork on low for 8-10 hours (or on high for 4-5 hours). Check on it every few hours and spoon sauce over the pork to keep in nice & moist.

Transfer the pork pieces from the crock pot to a plate or bowl. Using two forks, shred each piece of pork, and make sure to remove and throw away any large pieces of fat. Skim the excess fat off the top of the sauce in your crock pot, and then return the pulled pork to the crock pot and stir to combine. Let the pork sit in the sauce for a half hour to soak up all of the deliciousness. Serve the pork on sandwich rolls. Enjoy!!


Wednesday, March 21, 2012

Pico De Gallo

I’m one of those people who buys the same brand name products every week. I’m very particular with what brand of cottage cheese I like, or what frozen vegetables are best…. HECK, even what shredded cheese is best. I think this brand obsession comes from years of watching my mom and Rob's mom buy the same thing every single week. BUT, for some reason when Rob requests salsa I buy a different brand every.single.time.

We’ve tried so many salsas.. but none of them were great. You know the salsa you get in an awesome Mexican restaurant? It turns out you can’t buy those in the grocery store. And only recently did I think about actually trying to make one myself..

After trying 1,000 (exaggeration) salsas we have a pretty good idea of what we like. We like chunky salsa. Spicy.. but not too spicy. We like vinegar based salsas (who knew?). I’ve combined all of our must haves and I think I have a HIT. And it was so, so, SO easy.


Try it and let me know what you think.


Meghan’s Pico De Gallo
Makes 3 cups of salsa (approximately)

6 ripe roma** tomatoes, diced
2 BIG jalepenos or 3 regular sized ones, diced (most seeds removed)
3 cloves of garlic, minced finely
½ of a big white onion, or one whole small onion, diced small
1/3 cup apple cider vinegar
Juice of 1 lime
¼ tsp cayenne pepper
Salt and pepper to taste

**I prefer roma tomatoes (the long, skinny kind) because they have less seeds and make for a heartier salsa in my opinon. Feel free to use whatever tomato you like instead.

Combine all of the ingredients and refrigerate for at least 2 hours. Taste before serving.. you might find you want more cayenne (more heat) or more vinegar depending on how you like your salsa. If you’re sensitive and you DON’T like hot salsa, I would suggest leaving out the cayenne and slowly sprinkling it in until it meets your taste. Enjoy!!


Monday, March 19, 2012

Quinoa Salad

I have a confession. I love macaroni salad. Actually, I love basically any cold summer salad – potato, macaroni, slaw.. etc. Something about the creamy, onion-y bites of summer salads just BELONG with a BBQ’d meal.
It’s basically always summer here in SC so we’re ALWAYS grilling and I feel like I’m constantly hunting for that perfect summer salad recipe to compliment our BBQd main dish. But, my husband is a mayo-hater (GASP) and I have 5lbs of quinoa to use.. so you won’t be finding any pasta or potato salads in our house any time soon. Boo.

In an attempt to satisfy my cold summer salad craving AND use few more cups of quinoa from my 5lb bag, I came up with this little gem: Quinoa salad. Mmmmm it is GOOD. The flavors are light, but you can add literally anything you want to this blank canvas salad and I’m sure it would be delicious. Change it to your liking, you’ll thank me later.


Quinoa Salad
Serves (approximately) 6

2 cups cooked quinoa
1 cup diced English cucumber (remove the seeds to keep the salad from getting too soggy)
1 cup halved grape tomatoes
1/4 cup finely diced red onion** 
1/2 cup thinly sliced carrot
2 tablespoons chopped fresh parsley or fresh mint (optional)
1/2 cup crumbled feta cheese

**shock your red onion in an ice water bath if you’re afraid of a strong onion flavor.

Vinaigrette:
1/2 cup freshly squeezed lemon juice
2 tablespoons red wine vinegar (optional)
1/2 teaspoon sugar
1/2 cup olive oil
salt and pepper to taste
Cook your quinoa according to package instructions (but the pre-rinsed stuff if you can). Allow your quinoa to cool before preparing the salad. Chop up the salad additions. Feel free to add any other vegetables you might like.

Whisk together lemon juice, vinegar and sugar. Then, whisk in the olive oil until your dressing is smooth. Add salt and pepper to your liking, and pour the mixture over the cooked (cooled) quinoa. Stir in the chopped vegetables. After the vegetables, dressing and quinoa are well combined, gently fold in the feta. Enjoy!!


Monday, March 5, 2012

Why I decided to share my blog with the WORLD

This blog started almost a year ago in an attempt to stay connected to our close friends and family as we set out on a adventure as newlyweds and young military family. As the first BIG MOVE approached (Boston-Charleston), my self-created "civilian bubble" POPPED and I found myself scrambling to retain any sense of normalcy we once knew. I was panicking and wondering how the hell I would be able to keep in touch with everyone after moving 1000+ miles away, and felt like I really needed a place to track our adjustment to military life. 

Moving away from everything we've ever know has been the hardest and BEST thing we've ever done, and every entry in this blog is proof of that.

Over the past few months I've received requests from many, many people to read our blog, some people I NEVER expected. I was flattered, and obliged, but didn't make our blog address public on purpose.. I still wanted it to be our own private thing. However, as I found myself adding entry after entry, it became overwhelming to alert all of my readers individually that I had updated the blog. People lost the web address, and honestly, I was probably the only one reading it. While I wasn't blogging, I WAS cooking.. and I received many requests to create a food blog of my recent culinary adventures (as seen on FB). I found myself wondering if I should just go ahead and share this with the world. 

I've gone back and forth for MONTHS deciding if I wanted to make this public. Allowing the world to read about my life makes me very, very nervous. But, I think I'm ready. 

My amazing husband spent many, many hours helping me perfect this new layout and personalized banner. How awesome is it? I'm just so excited to share it with you all. You'll see that I HAVE added a Culinary Adventures tab, where you'll find all of my food blogging entries. The Navy Life blog will continue to detail the ups & downs and every day life of our little Navy family. 

Whether you're a friend, family member, fellow Navy wife, or some creeper from Facebook (yes, YOU), I hope that you enjoy reading. Please leave comments, I'd love to know who you are.

XO
Meg


Friday, March 2, 2012

Quinoa Cakes

Have you discovered Quinoa yet, people? No? Get in your car. Right now. Go buy some. Actually, maybe you should wait till this weekend when you have time to go to Costco to get the 5lb bag. It's THAT GOOD.

Quinoa, (pronounced keen-wah) is a gluten-free seed that originates from South America and in my opinion, is a gift from the culinary GODS. It's incredibly healthy (LOADS of protein, dietary fiber, iron & B vitamins) and incredibly versatile, and is most often used as a substitute for rice or pasta. You know the joke I made about the 5lb bag? Yeah, I actually have one. And I plan to use every last seed in that bag.

If you're a vegetarian & looking for some extra protein, quinoa is for you.
If you're not a vegetarian and you just don't eat a ton of meat, quinoa is for you.
If you love meat and you hate vegetables, quinoa is for you.
If you're cutting carbs, but can't give up that starchy must-have at dinner, quinoa is for you.

Essentially, if you like food, quinoa is for you.

I'm not kidding.

In my quest to use this huge bag of quinoa I've tried a few recipes.. here's my first success.

QUINOA CAKES
Makes about 8 big burgers
(Adapted from EatingWellLivingThin)

2 cups cooked quinoa (buy the pre-soaked quinoa if you can -- it speeds up the process)
1 cup shredded sharp cheddar cheese
1/2 cup low-fat cottage cheese
1 large carrot, finely grated with a cheese grater or microplane
3 eggs
3 tablespoons all purpose flour
2 green onions, including white parts
1 /2 teaspoon sugar
1/4 teaspoon black pepper
1/2 teaspoon ground cumin
1/8 teaspoon salt
1/2 teaspoon garlic powder
Olive oil for frying

Combine all ingredients in a large bowl. Mix well and make sure the spices are incorporated evenly. The mixture will be quite sticky and you'll probably wonder how the cakes will stay together when you fry them. Don't worry, they will.

Add enough olive oil to coat the bottom of your frying pan and heat it on medium-low heat.

When the pan is hot, use a 1/3 cup measuring cup to portion our your cakes and add them to your pan. Flatten the cakes to about 1/2 inch thick and do your best to round the edges (if you're anal like me and care about that kind of stuff).

Fry on low heat for 5 minutes per side or until golden brown. A big frying pan will probably be able to fit 4-5 cakes at a time. Be careful not to break the cakes when you flip them.

Enjoy!!


Wednesday, February 15, 2012

Chocolate Mug Cake

Have you ever had one of those nightmare days when everything is going wrong and you think to yourself "I just really need a piece of chocolate cake"? If you're like me, that craving lasts approximately 4 minutes and you never muster up the will to actually bake anything of substance.. instead reverting to the dove chocolates stashed in the back of your freezer.

OH LORD  DO I HAVE A TREAT FOR YOU.

Feast your eyes on these little babies: Chocolate Mug Cakes!! Tiny, individual chocolate cakes made in the MICROWAVE. Decadence at your fingertips.

Be careful with these.. they are dangerously easy to whip together.

Chocolate Mug Cake
Makes one small mug cake
(Adapted from 2Stews.com)


3T unsweetened cocoa
3T sugar
1T flour
3T milk (I used 1%)
1 medium egg white
1/4T vanilla
Milk chocolate chips

Mix cocoa, sugar & flour in the mug. Then add the milk, egg white and vanilla. Stir like CRAZY for 2 minutes, making sure to remove all lumps. Add chocolate chips (to taste). Microwave on high for around 2 minutes*.

Enjoy!!

**Microwave temps vary, make sure to watch your cake carefully and test with a knife or toothpick to make sure the center is cooked.


Monday, February 13, 2012

Baked Eggs Napoleon

I love breakfast. In fact, I'd eat breakfast for every meal if I could... ESPECIALLY for dinner. When I was growing up my parents called breakfast-for-dinner "Silly Supper".. not sure why, since in my opinion there's nothing silly about breakfast for dinner ;-)

If I had my way I'd make Silly Supper once a week.. but my carnivore husband insists it doesn't fill him up enough. SO.. I have set out to find more filling Silly Supper options. Here's my most recent find:

Baked Eggs Napoleon
Makes 4 eggs, or 2 servings


3 cups frozen shredded hash browns, thawed
1T butter
1/2 cup shredded sharp cheddar cheese
1/2 tsp garlic powder
4 eggs
Salt & Pepper to taste

Preheat oven to 375F and start heating a small skillet on the stove on high heat. Melt butter in skillet and add thawed hash browns. Cook until golden brown.

Divide hash browns among 4 small, greased, ramekins. Make a little nest in the hash browns with your thumb or a spoon (so the egg sits directly in the middle of the dish when you crack it). Sprinkle hash browns w/ salt, pepper and garlic powder (to your taste). Top hash browns w/ shredded cheese, making sure to leave the little nest for the egg. Crack an egg into each ramekin, being careful not to break the yolk. Sprinkle the top of the eggs with any herbs you like & black pepper.

Place the ramekins together on a rimmed cookie sheet (this will make it easier to remove them when they're hot!). Bake at 375 for 10-15 minutes.. checking on the eggs frequently. Cooking times will vary based on the size of your egg. Make sure the egg white is set but the yolk is runny.

Serve with fresh fruit and of course BACON (if your husband is a carnivore, too) :-)

Enjoy!!


Friday, February 3, 2012

Nuclear Power School Graduation

Today was Rob's graduation from Nuclear Power School. After 6 months of 4:30AM alarms and hours and hours of studying, NPS is OVER. And what makes it even more exciting is that my AMAZING husband graduated second in his class! 

SO PROUD!
My handsome Officer!
I swear I am more proud of him every single day.

I love you, my Ensign. XO

Wednesday, February 1, 2012

Official Orders

We're learning pretty quickly that "Plan NOT to Plan" is the unofficial motto of Navy families... but we're learning to roll with it :)

When we received our FIRST orders to Charleston last year we expected to be here for no longer than 1 year. Rob's first orders were to Nuclear Power School - the 6 month school he will graduate from in a few days. We expected to stay in Charleston for an additional 6 months for the next phase of training (Prototype), but knew we could also be moved to upstate NY for that training. We decided to make the most of our time here in Charleston just in CASE we had to move to NY for Prototype.

Well, with only a few days left of Power School we finally (!!) have our next orders! It looks like we'll actually be staying in Charleston for a whole 'nother YEAR! Rob will be on "hold" with the Navy for a few months, and will report to Submarine Officer Basic Course (SOBC) in Groton, CT sometime this Spring for a 10 week training. SOBC is an unaccompanied training, so I'll stay here in SC with the other USN wives. After SOBC Rob will come back to Charleston for Prototype, which will be his last phase of training before joining the fleet. There is a back-up in training with the entire submarine force of the Navy but hey -- another WHOLE year of living in Charleston!? We can totally handle that.

Here's to another year of sweet tea, palm trees, and my (2nd) favorite city in the country. Ahhh.

I think I need to get myself some cowboy boots.... :)